Overview
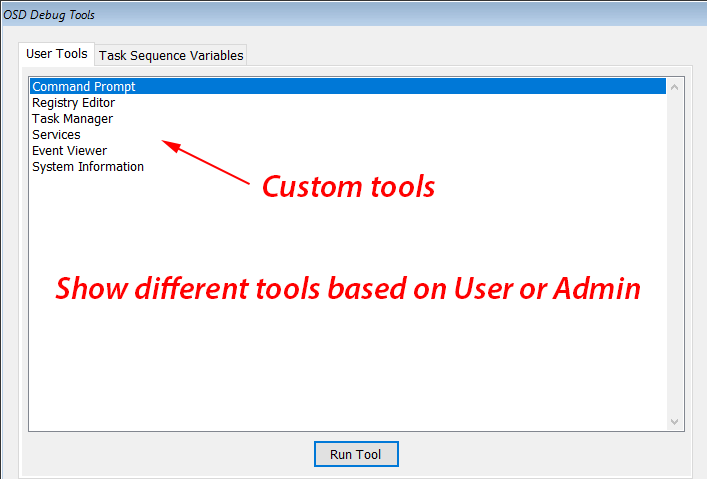
OSD Background is a freeware utility for branding SCCM and MDT Operating System Deployment. It also provides user configurable debug tools and task sequence variable editing. The tools can be password protected and split into categories based on a user or admin password prompt.

User Configurable Tools

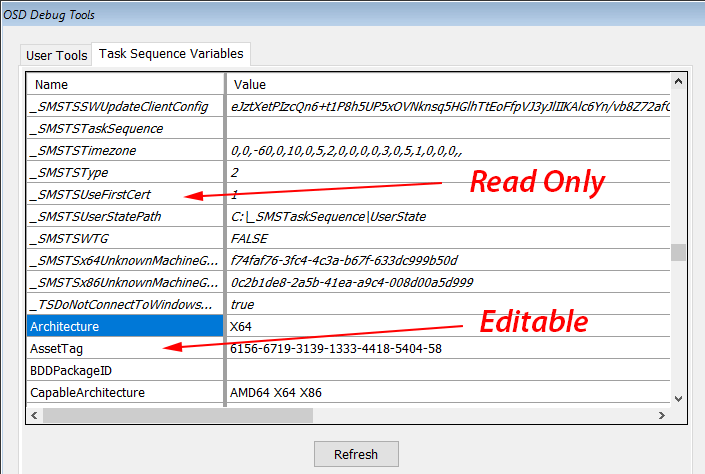
Review and Edit Task Sequence Variables
Background
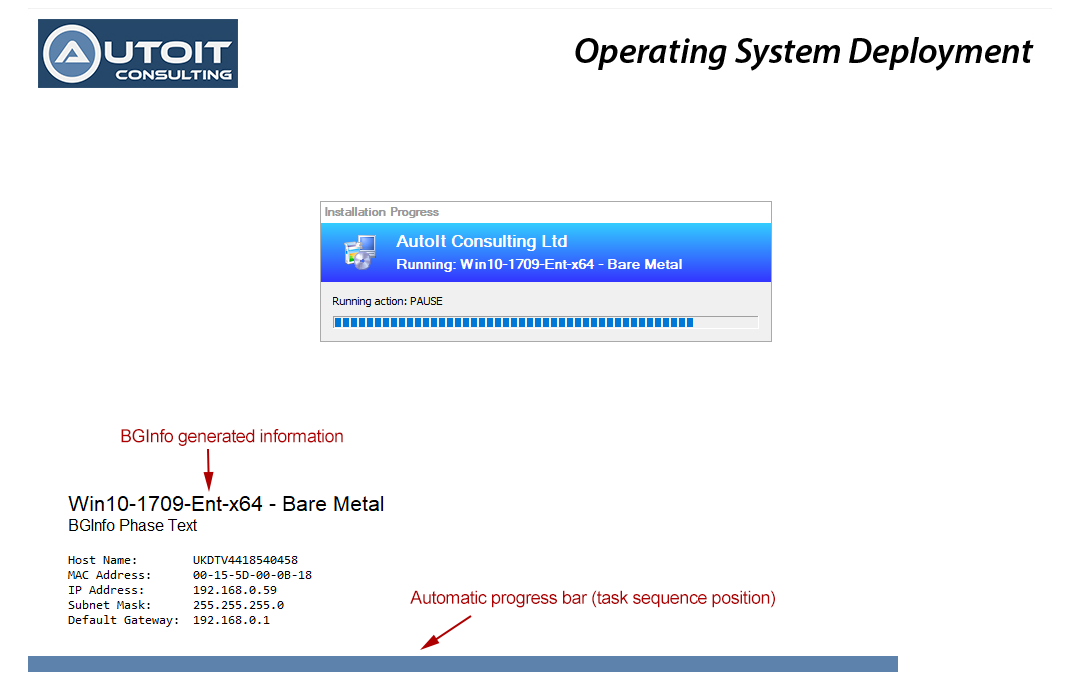
When doing an SCCM or MDT Operating System Deployment a common task is to customise the background that is shown during the various stages of the build. The most popular way to do this is to use the Microsoft Sysinternals tool BGInfo.exe to set the system wallpaper. BGInfo.exe is very widely used and can be configured to show lots of information about a machine. BGInfo.exe can be run at various stages of a deployment to show computer information or build phases with little effort. This can be seen in this blog post called Snazzy OSD Status with BGInfo. In fact, MDT comes with a built in script called ZTISetBackground.wsf that has a preconfigured BGInfo config file and the script can set the wallpaper from a set of background files.
Issues
During Windows 7 setup there is a window that shows the message “Setup is preparing your computer for first use”. On Windows 8 and Windows 10 that message is “Getting Ready” or the circling dots animation. These setup windows obscure the background making the BGInfo solution fail. MDT had a solution for this for Windows 7 in the ZTISetBackground.wsf script that used a custom WindowHide.exe executable to hide the offending window by its title – which was FirstUXWnd – thus revealing the previously hidden background image. On windows 10 the window name changed to Progress, but on both Windows 7 and 10 the class name is the same which is FirstUXWndClass.
Unfortunately, on Windows 10 hiding this window still does not reveal the background. The only solution is to create a new custom window and place it above this progress window and fill it with our wallpaper bitmap thus creating a “fake” background.
There are a number of applications I’ve seen that can already do something like this but I wanted to do my own version that works for me in the way I want and to provide the source code to help others.
Features
Here are some solution highlights:
- Works on Windows 7, Windows 8 and Windows 10 with .NET 4.0 or later.
- Works on WinPE (requires Windows 8+ versions that can have .NET components added)
- Automatically hides the Windows 10 default progress window. No need to run WindowHide.exe first
- Creates a custom screen behind other windows to simulate desktop wallpaper
- Automatically updates a customisable progress bar based on the current position within a task sequence. Run it once each reboot and forget it.
- If you run the tool multiple times it will close down previously executed versions. No need to taskkill each time
- Hotkey combination (Ctrl+Alt+F12) will bring up a debug menu.
- Debug menu can be protected with two different passwords for Admin and User levels access.
- User-configurable tools menu. Command prompts, registry editing, system information, anything! Individual tools can be marked as ‘Admin Only’ and are only shown when the Admin password is used to open the menu.
- Editable list of task sequence variables.
- Review and edit OSD Task Sequence variables.
License
OSD Background is a freeware tool. It is free for all uses, including commercial.
Current Versions and Downloads
| Version | Date last updated | Notes |
|---|---|---|
| v1.0.0 | 28th June 2018 | Notable changes this version:
|
Usage
I’ve decided to stay with the BGInfo + Custom exe style of usage as BGInfo is infinitely customisable trying to reproduce that kind of scheme within my own application would only lead to frustration.
The basic usage is:
- Edit Options.xml to customise as required
<Options>

  <!-- Show progress bar for current task sequence progress -->
  <ProgressBarEnabled>true</ProgressBarEnabled>

  <!-- The color of the progress bar in HTML/RGB format: #RRGGBB -->
  <ProgressBarForeColor>#5D83AC</ProgressBarForeColor>
  <ProgressBarBackColor>#FFFFFF</ProgressBarBackColor>

  <!-- Location of the progress bar. Top or Bottom -->
  <ProgressBarDock>Bottom</ProgressBarDock>

  <!-- Offset in pixels from the Top or Bottom of the screen -->
  <ProgressBarOffset>4</ProgressBarOffset>

  <!-- Height of the progress bar -->
  <ProgressBarHeight>4</ProgressBarHeight>

</Options>
- Run BGInfo.exe to customise the desktop wallpaper (or manually set the wallpaper if preferred) at various places in the OSD build process
- Run this command to ensure that the wallpaper can be seen in the background:
AutoIt.OSD.Background.exe Options.xml
- Remember to rerun the command after each Restart Computer step in the task sequence to reshow the background after each reboot.
Windows 10 Additional Requirements
On the latest versions of Windows 10 you must also use a custom unattend.xml file with the SkipMachineOOBE and SkipUserOOBE options set to true otherwise there seems to be a block on any windows being shown at all – even the SCCM progress bars are invisible. The example below is for the x64 version of Windows 10.
<?xml version="1.0" encoding="UTF-8"?>
<unattend xmlns="urn:schemas-microsoft-com:unattend">
   <settings pass="oobeSystem">
      <component xmlns:wcm="http://schemas.microsoft.com/WMIConfig/2002/State" xmlns:xsi="http://www.w3.org/2001/XMLSchema-instance" name="Microsoft-Windows-Shell-Setup" processorArchitecture="amd64" publicKeyToken="31bf3856ad364e35" language="neutral" versionScope="nonSxS">
         <OOBE>
            <HideEULAPage>true</HideEULAPage>
            <HideLocalAccountScreen>true</HideLocalAccountScreen>
            <HideOEMRegistrationScreen>true</HideOEMRegistrationScreen>
            <HideOnlineAccountScreens>true</HideOnlineAccountScreens>
            <HideWirelessSetupInOOBE>true</HideWirelessSetupInOOBE>
            <ProtectYourPC>1</ProtectYourPC>
            <SkipMachineOOBE>true</SkipMachineOOBE>
            <SkipUserOOBE>true</SkipUserOOBE>
         </OOBE>
      </component>
   </settings>
</unattend>
Screenshots
Run Custom User Tools

View and Edit Task Sequence Variables


